Stripe, one of the world’s leading payment gateways has become a popular choice in recent years among online business owners. Stripe, similar to PayPal, offers a secure platform with competitive rates. In this article we will take a look at how an online business owner can accept recurring payments from their customers via Stripe.
If you run your own WordPress website, whether you want to start charging your customer’s daily for horoscope readings, weekly for a magazine subscription or monthly for access to digital content, this article will help you to achieve your goals.
Using our free Stripe Payments Plugin and the premium Stripe Subscription Addon accepting recurring payments has never been so simple.

When Would I Need to Accept Recurring Payments on my Website?
Recurring payments often referred to as subscription payments are ideal when offering a product or service that is delivered over a set period of time. Recurring payments involve a specific amount being debited from your customers credit card daily, weekly or monthly and credited into your Stripe account.
This means that your customers never have to worry about a late payment fee or entering their card details more than once. Recurring payments are hassle free and allow you to set up ongoing payment plans with your customers. Below are some examples when a recurring payment system may be suitable:
Membership Sites
Recurring payments are the basis of membership sites. Members are allowed access to hidden content for a set fee per period. Some membership sites include although are not limited to: Netflix, Online Newspapers, Graphical Content Sites, Music Streaming Sites and Cooking Sites.
Access Sites
Access sites are put in place so that their customers can be regularly direct debited for a physical service.
For example, an access site may include a local gym. This way someone can sign up online to a recurring payment system and enjoy the gym for a set price per week. An access site may also offer classes such as a baking class. The hopeful baker signs up online for one class each week. Their account then gets debited weekly.
Product Sites
Recurring payments can also be set up on a site that offers physical products. For example, your customers may sign up to be debited monthly for a magazine subscription.
How Can I Offer Recurring Payments on My Site?
To offer recurring payments on your WordPress website you will need to install and activate the following:
- The free Stripe Payments Plugin
- The premium Stripe Subscription Payments Addon
Once the base plugin and the addon have been activated on your site you will see one menu titled Stripe Payments and two of the sub-menus will be titled Subscriptions and Subscription Plans.
Setting Up Stripe Recurring Payments
Now that you have the plugin and addon on your site you will need to complete some simple configuration. Then you’ll be ready to start offering some recurring payment products or services.
#1) Basic Configuration
Step 1) Ensure you have a Stripe account.
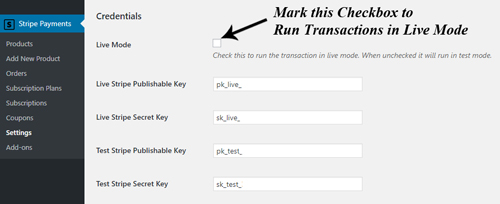
Step 2) Click on the Settings menu under Stripe Payments. Ensure all fields are correct including the Currency.
Step 3) Enter in your Stripe API Keys in the correct fields and ensure you Save Changes.
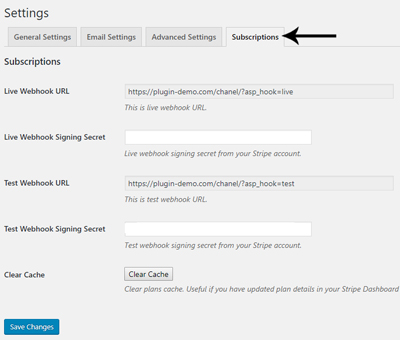
Step 4) Within the Settings menu you will see a tab titled Subscriptions. Click on this tab.
Step 5) Set up your Stripe Webhooks. Information on setting up your Webhooks can be found here.
#2) Setting Up a Recurring Payments Plan
Now that the basic set up of the plugin and addon have been completed you are ready to create a recurring payment plan.
Step 1) Click on the Subscription Plans menu.
Step 2) Click on the Add New Plan button.
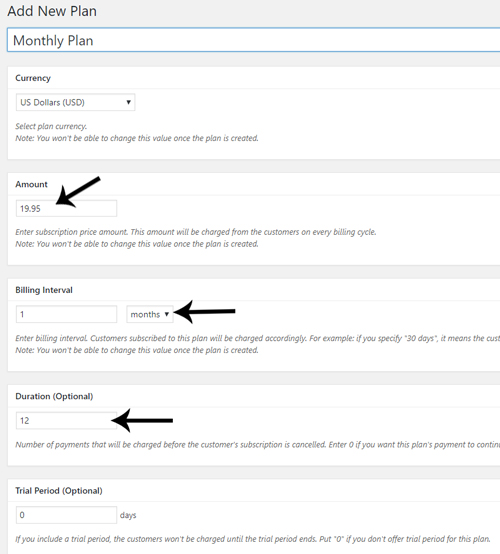
Step 3) Fill in all required fields to create a new plan. You can also offer a free trial billing period where payments will not be deducted from the customers account until the trial is over.
In the plan below, the customer will be billed $19.95 once per month for 12 months. There is no trial period.
#3) Adding a Recurring Payment Plan to a Product
Now that we have created a recurring payment plan, we will need to add it to our product. This way when someone purchases the product, the recurring payment plan applies.
Step 1) Create a product by clicking on the Add New Product button in the Products menu (under Stripe Payments).
Step 2) Add in all the details about your product or service that you will be selling.
Step 3) In the Price & Currency section, choose Subscription. From the Plan ID drop-down, choose the subscription plan that you’d like to apply to this product.
Step 4) Once you have entered all your product details, click the Publish button.
Step 5) You have now created a product with recurring payments.
How do my Customers Checkout with Recurring Payments
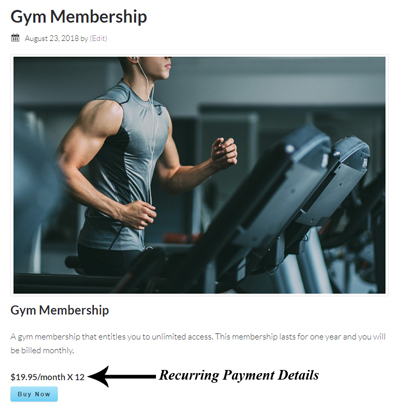
Just like any other product, your customer can click on the ‘Buy Now‘ button. They will need to enter their email and credit card details followed by the ‘Pay‘ button.
They will now be charge the first of their recurring payments. Each period they will be automatically billed until the duration of their subscription is complete (or cancelled).
All your customer’s subscriptions are recorded under the Subscriptions menu. You can also cancel a customers subscription from this menu at any point.
Example: Customer’s Subscription Information
The screenshot below demonstrates how a customers subscription details are stored. You can view further information about their subscription and payments by clicking on the View Details button.

How to Accept Recurring Payments via Stripe On your WordPress Site shared from Tipsandtricks-HQ
How to Accept Recurring Payments via Stripe On your WordPress Site syndicated from Aileen Batts Blog
from Leslies Tumblr http://lesliesrubin.tumblr.com/post/177302132127
No comments:
Post a Comment